
![]()
Specs: |
Any deviations from specifications must be corrected by race time or the car will be disqualified. |
|
Body: |
Main body must be of wood. Additional items may be added for
weight or design.
|
|
Weight: |
1.50 lbs. or less as determined by the official scales. |
|
Length: |
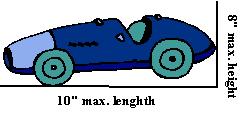
10.00 inches overall or less. |
|
Height: |
8.00 inches overall or less. |
|
Width: |
4.75 inches overall or less. |
|
Special Note: |
The forward most part of the car must be at least 1-inch wide at the starting pin and must not extend over it! |
 |
|
|
Dimensions |
Front end of car must not extend over starting pin. |
|
|
|
|
The forward most part of the car must be at least 1'inch wide at the starting pin. |
||
FasCar Kit Racer Assembly Instructions
Your Indy Products Manufactured racer is designed to be easy to assemble,
without the need for expensive tools. Follow these easy step assembly
directions.
Polish the axle ends with medium to fine grit emery cloth. Polish with 400 grit followed by 500-600 grit. A fine polishing paste may be used for a high luster (an automotive rubbing compound will work).
Shape, sand and paint the wood body. Do not put paint in the pre-cut axle slots, as they are a tight fit and paint may interfere with assembly of the axles.
Glue the axles into the body. The long axle is for the
front and the short axle is for the rear.
* Use a 2 part epoxy adhesive. Apply the mixed epoxy to the
slots and force the axles into the slots.
* With the aid of a ruler, center the axles in the slots and clean off
any excess adhesive.
* Install a wheel on each axle end and place the racer on a flat
surface (Table tops are not usually flat. A glass plate or mirror can
be used for the flat surface.) Adjust the axle in the slot until all 4
wheels touch the flat plate. Allow the epoxy to harden.
Add weight to the racer to reach the allowable maximum. The best location for the weight is usually toward the rear end near the axle centerline.
Lubricate the wheels by applying a very small amount of light weight oil or silicone. (It is very important to use a very small amount. Too much liquid in the wheel bearing will cause excess friction).
Separate the thin washer, or ring, from the red end cap/wheel retainer. Install the ring on the axle so that the flat side is next to the wood racer body. The axle end should be prepared for the "snap-on" retainer by scratching a shallow groove in the axle. The groove should be located approximately 1/8" in from the end. Use a triangular file to produce this groove. The groove provides a place for the ridge, that was molded on the inside of the retainer, to grip.
The wheels require no preparation, except lubrication, since they were machined to precision tolerances.
You have not accomplished the most difficult and important part of building a derby racer, that is install the axles so that they are straight and parallel.